Introduction to the Inspections Feature
The Inspections feature supports the management of Procorem Inspect inspections. You can access inspection from the account level (a cross-property view) and from within each individual property.
For information about the Procorem Inspect mobile app, see Procorem Inspect App.
Access to the Property feature is controlled by module entitlements and user permissions.
The account administrator can create account roles with any combination of the following Inspection feature permissions.
Permission | What It Controls |
|---|---|
Create Inspection | Show the New Inspection button on the Inspections list and create new inspections. |
Update Inspection | Show the Manage Inspection button on the inspection detail page; add and edit areas and findings, upload photos, and generate reports. |
Delete Inspection | Show the Delete button inside the Manage Inspection popup. |
View All Inspections | Show the Inspections menu item in the left navigation panel and the Inspections sub-menu on property pages. Without this permission, the Inspections section is hidden. |
Manage Inspection Templates | Show the Inspection Templates menu item in the left navigation panel and access the templates page. |
Manage Property Specific Inspection Items | Show the Property Specific Inspection Items tab on the property details page and access that page directly. |
For more information about account role security, see Manage Account Roles.
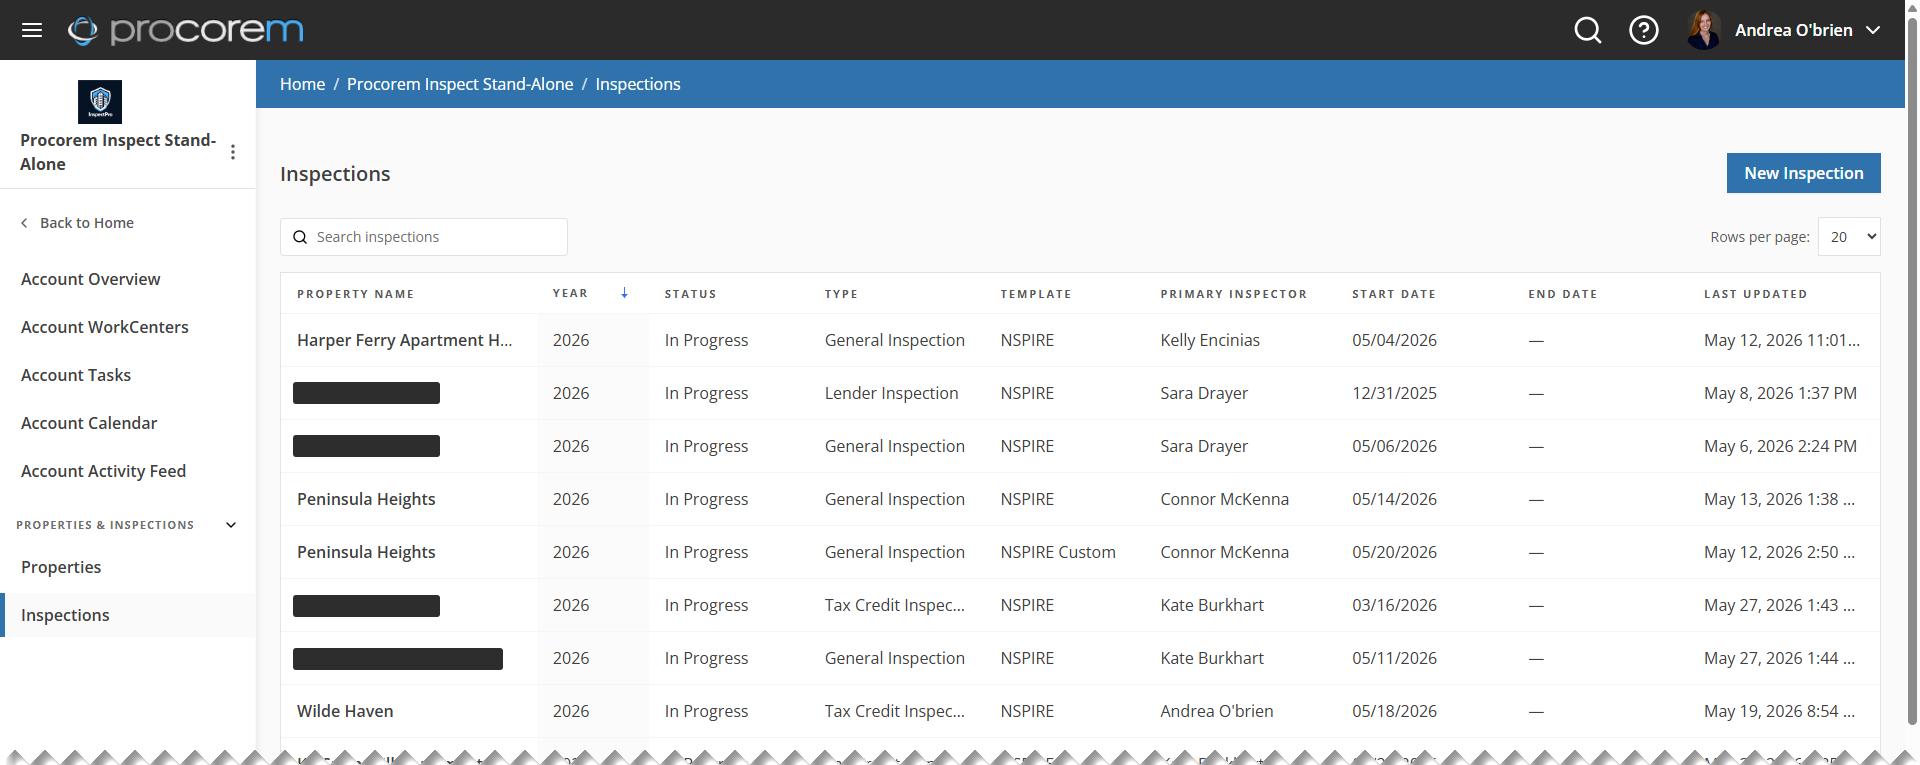
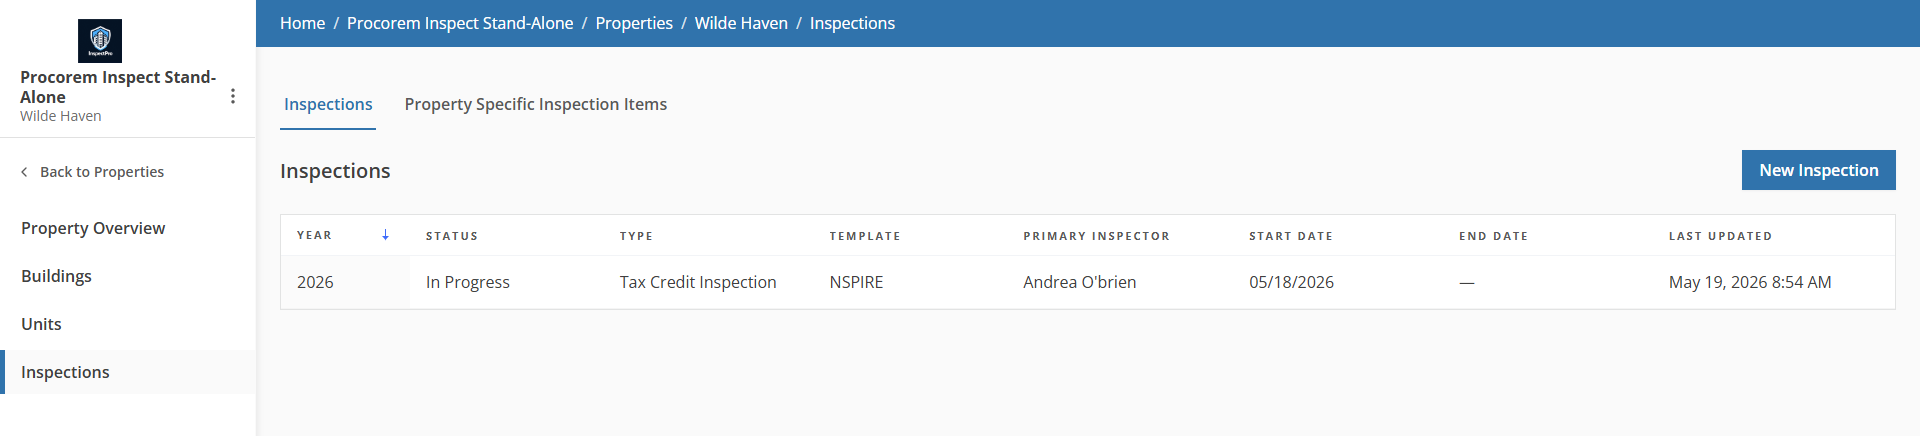
The Inspections list page provides a view of inspections. From the account Inspections page, you can view all inspections for all properties in the portfolio. From the property Inspections page, you can view the inspections associated to the specific property.
Account inspections; property inspections
From the Inspections list page, you can:
Click a column header to sort the table by that column in ascending order. Click again to sort in descending order.
Navigate to a specific Inspection record with a row click.
Manage Property Specific Inspection Items (from the property-level inspections list only).
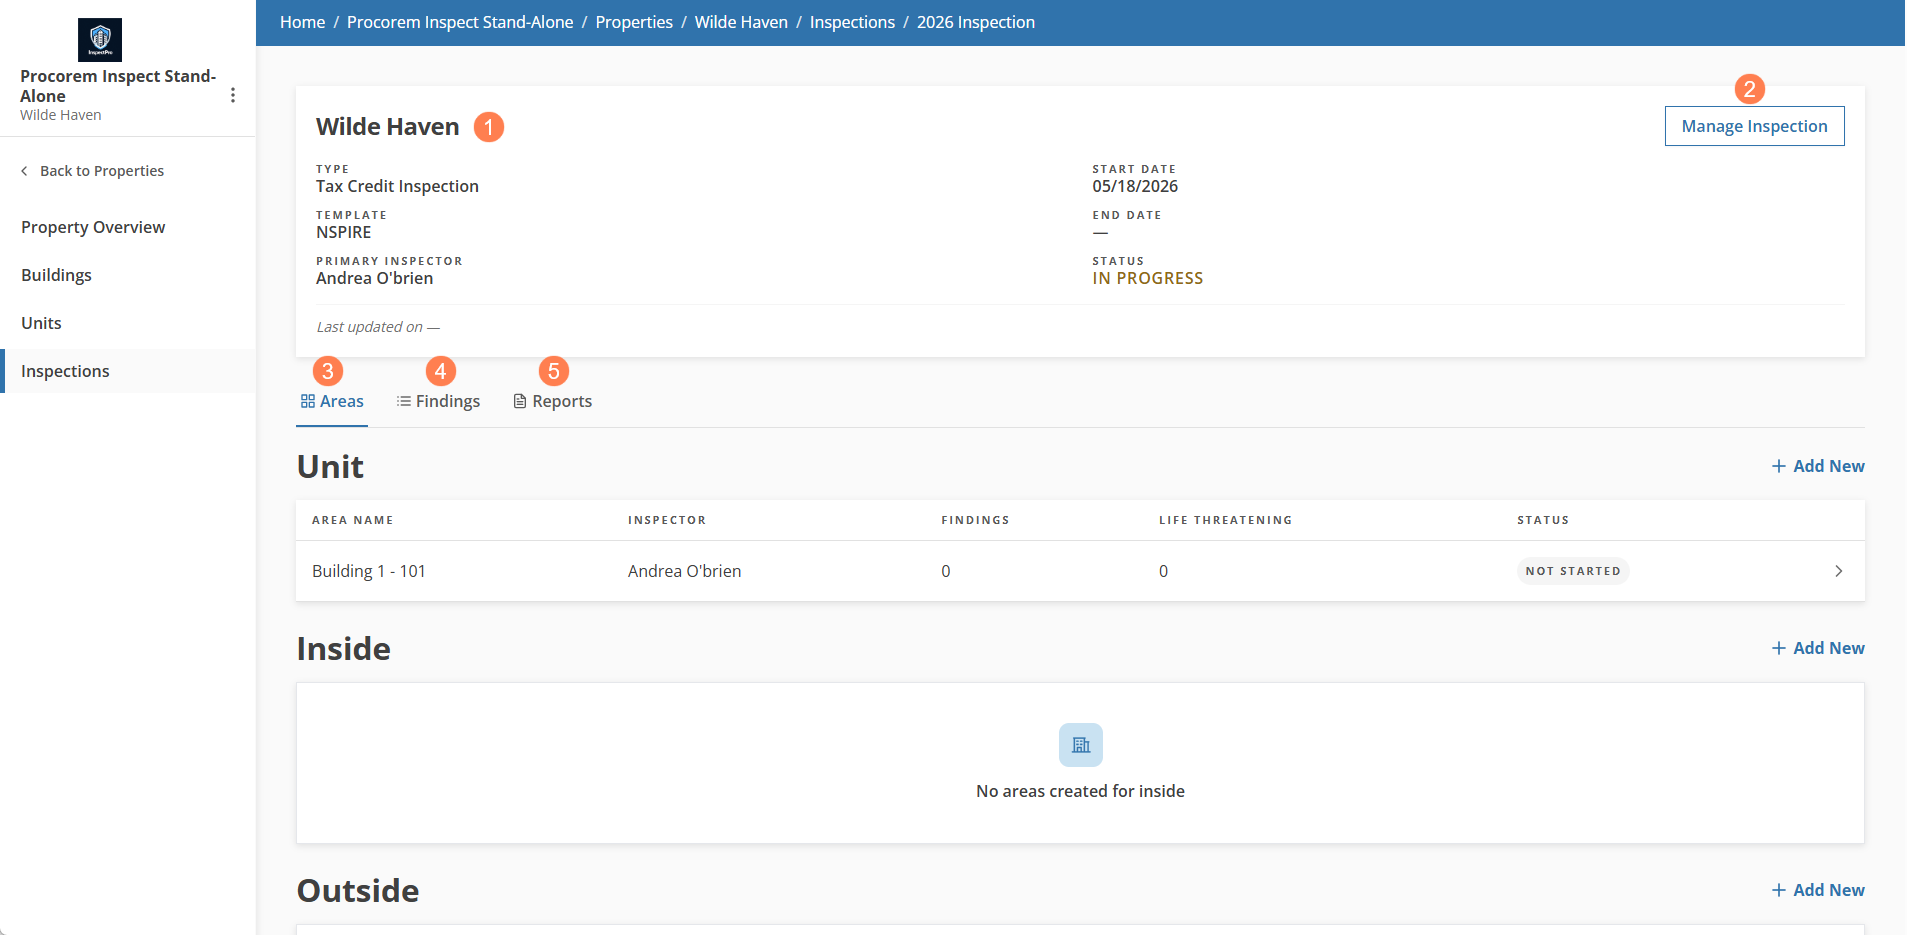
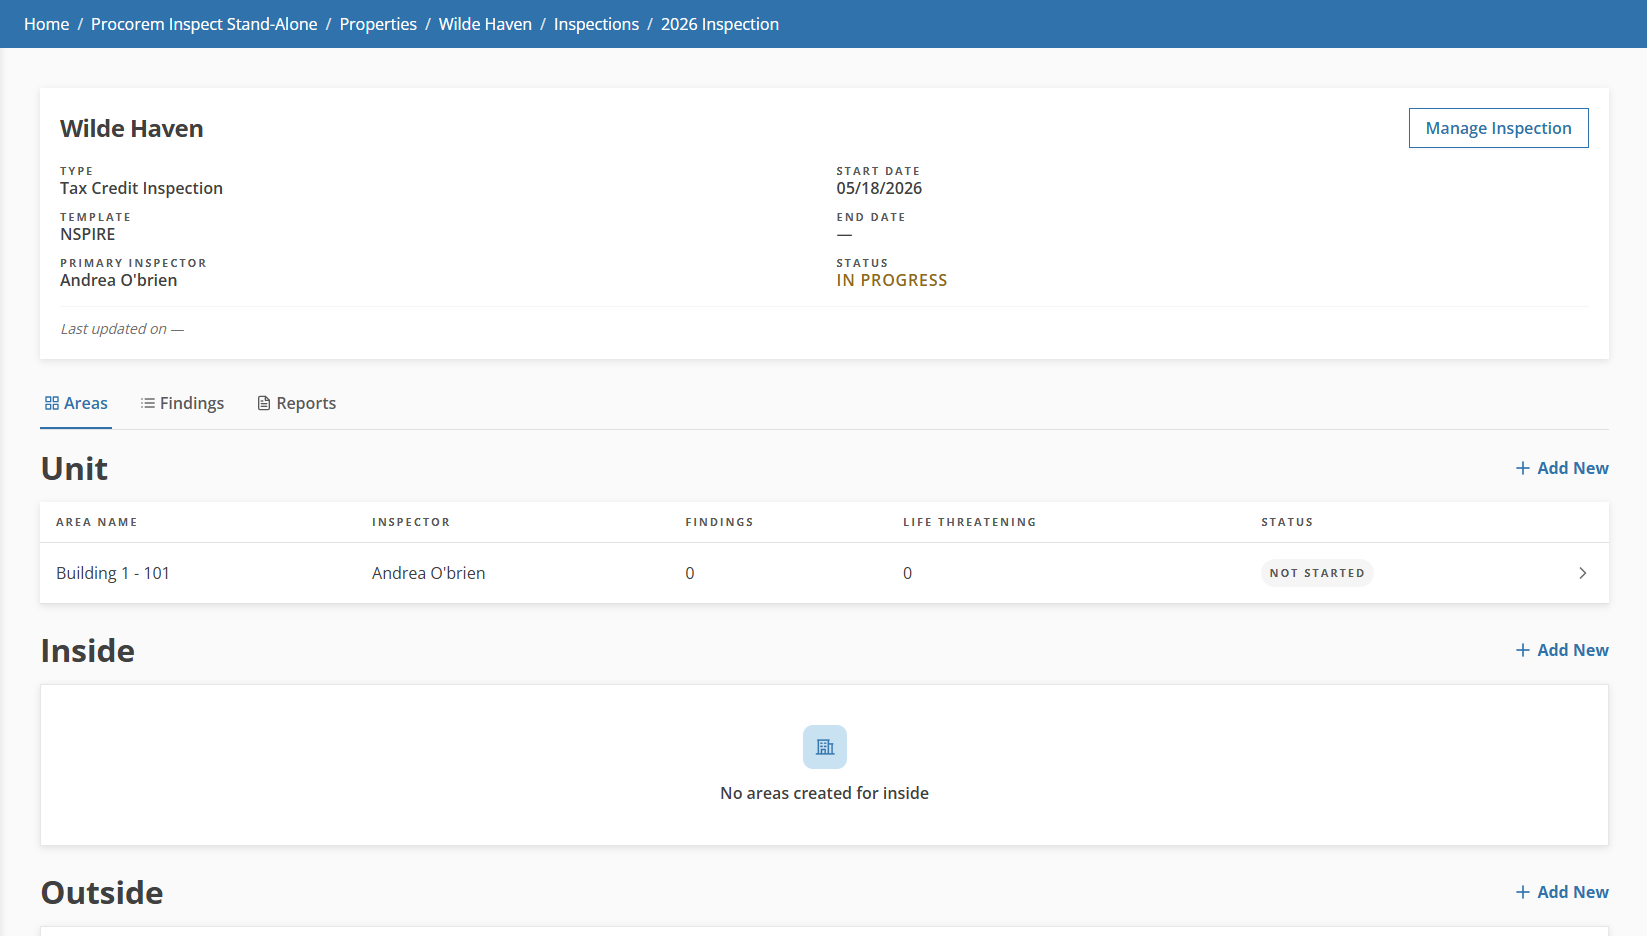
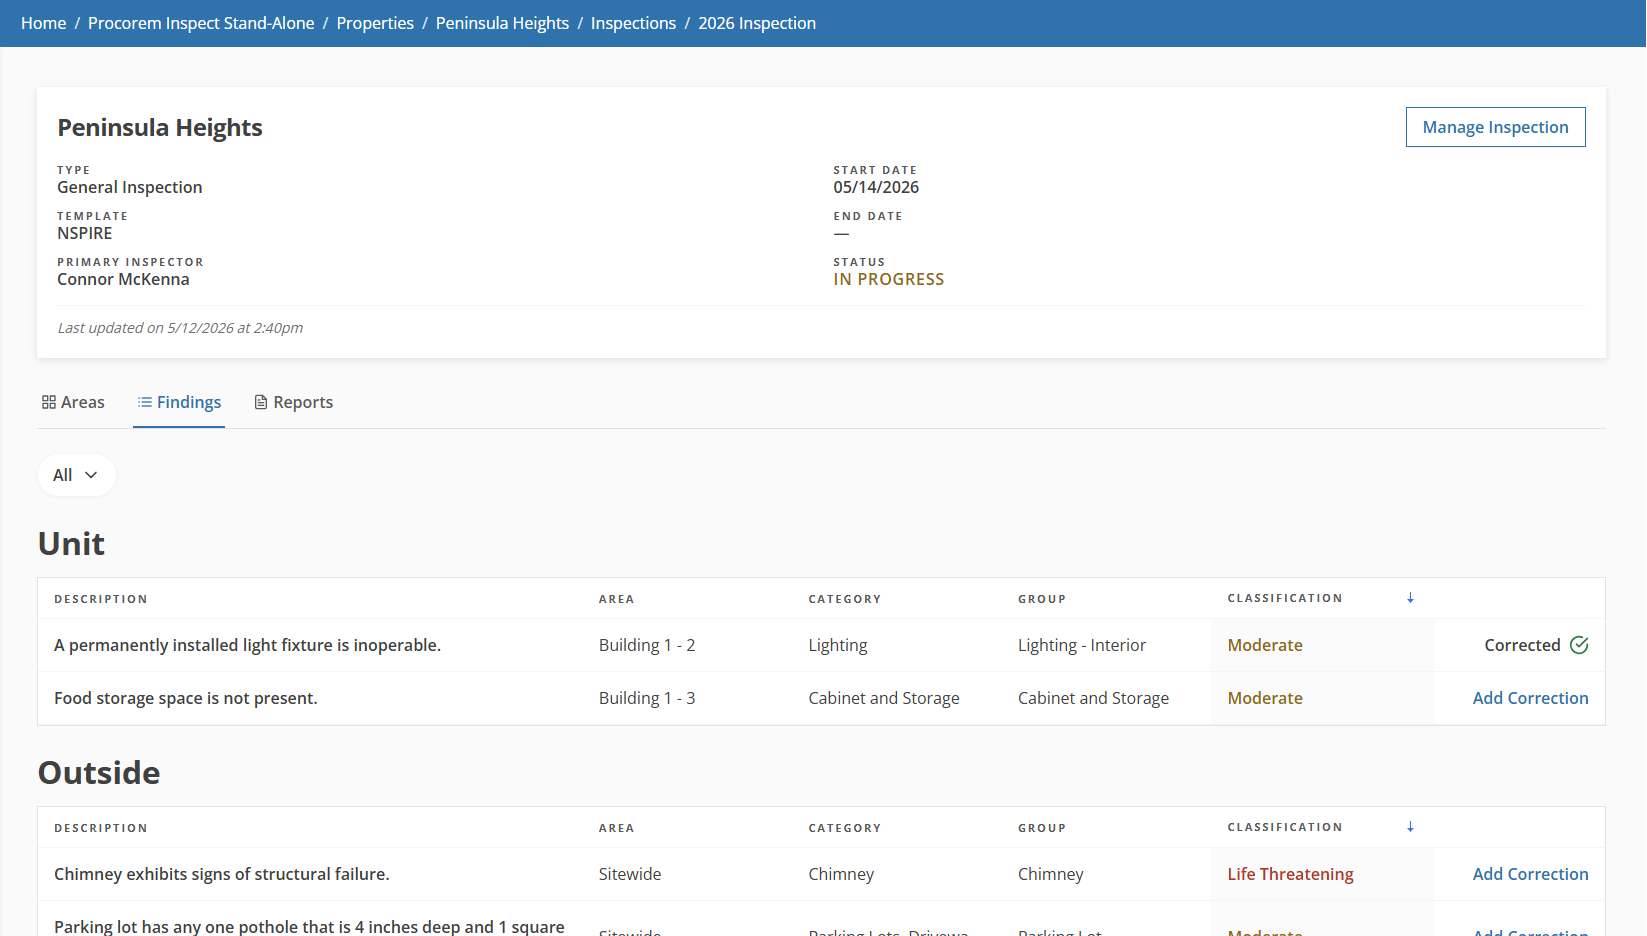
From the Inspection Overview page, you can:
View the inspection type, template, primary inspector, start and end dates, and last updated date for the record.
Manage the inspection.
You can delete the inspection from the Manage Inspection popup. This results in the cascading deletion of all associated areas, findings, and photos.
Add an Inspection
Navigate to the Inspections list (at the account level or property level)
Click New Inspection.
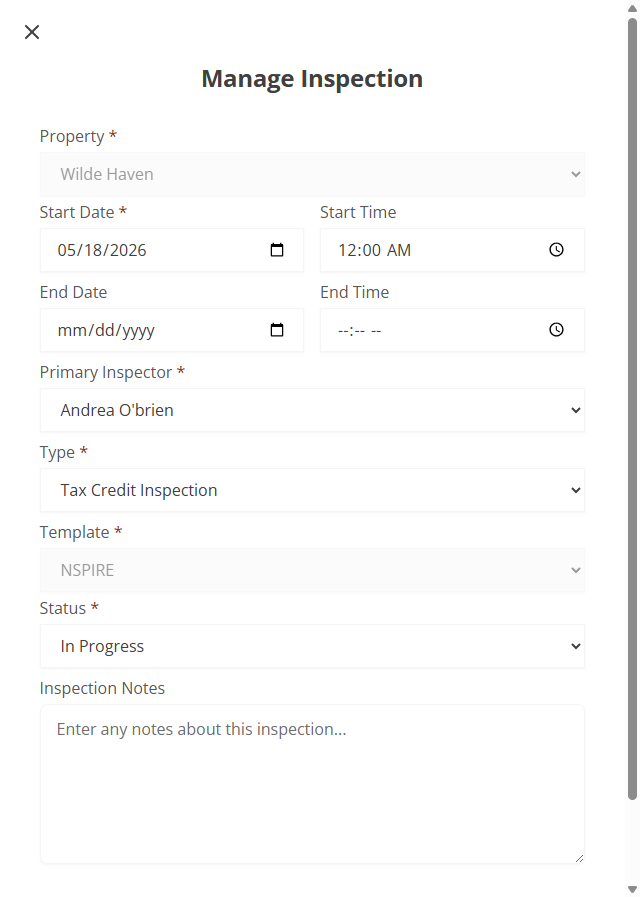
The New Inspection popup opens.
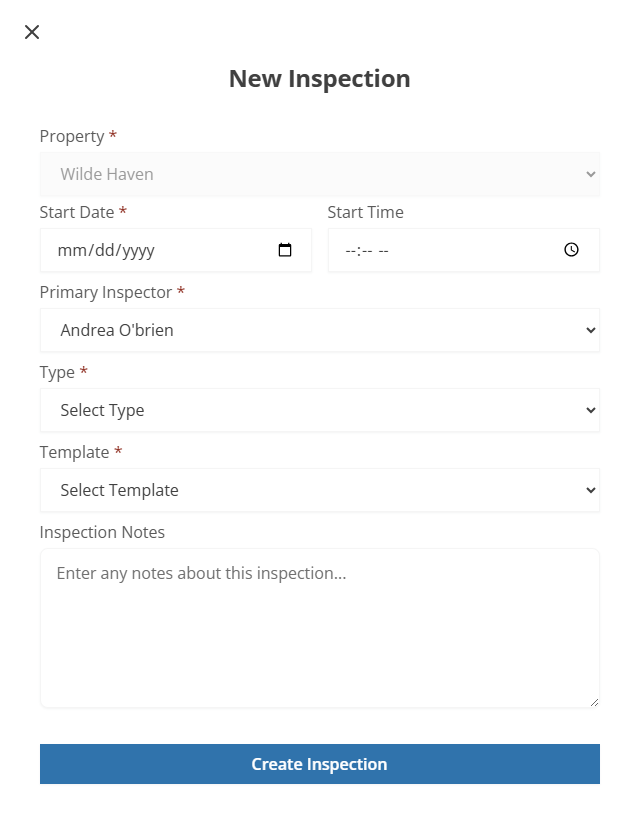
Select the Property if you are starting from the account level. If you are starting from the property level, the field defaults to the starting property.
Select or enter the Start Date.
Select the Primary Inspector from the active inspector users associated with the account. The field defaults to your name if you are in the list of inspectors.
Select the inspection Type.
Select the inspection Template.
Optionally, enter any Inspection Notes.
Click Create Inspection.
The Inspection record is created and opened. The status is set to Scheduled.
The Areas tab allows you to review, add, edit, and delete the areas for inspection, as well as manage area assignments. You can view the assigned inspector, the count of findings, the count of life threatening findings, and the status for the area.
Add an Area
From the Inspection Overview page, click Add New for the area type.
The Add Unit Area popup opens.
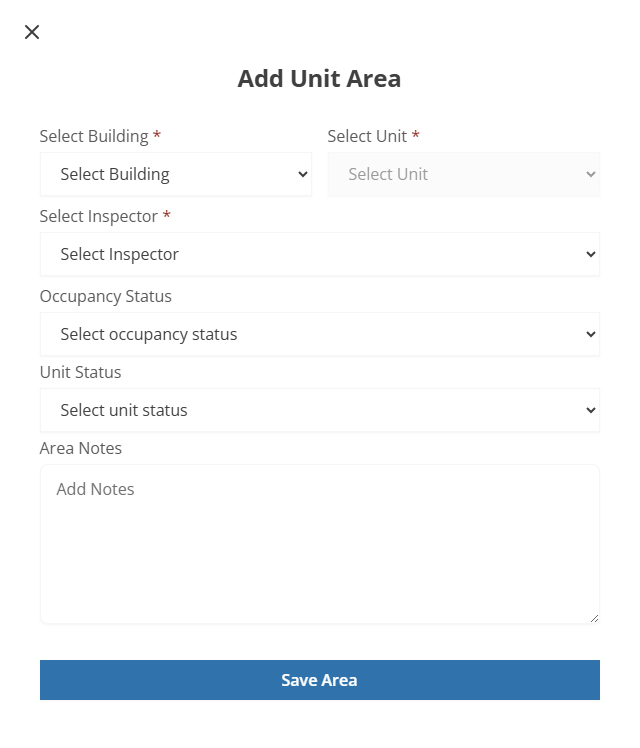
For Unit area types, select the Building and Unit.
For non-Unit area types, select the Area.
Select the Inspector.
Optionally for Unit area types, select the Occupancy Status.
Optionally for Unit area types, select the Unit Status.
Optionally, enter Area Notes.
Click Save Area.
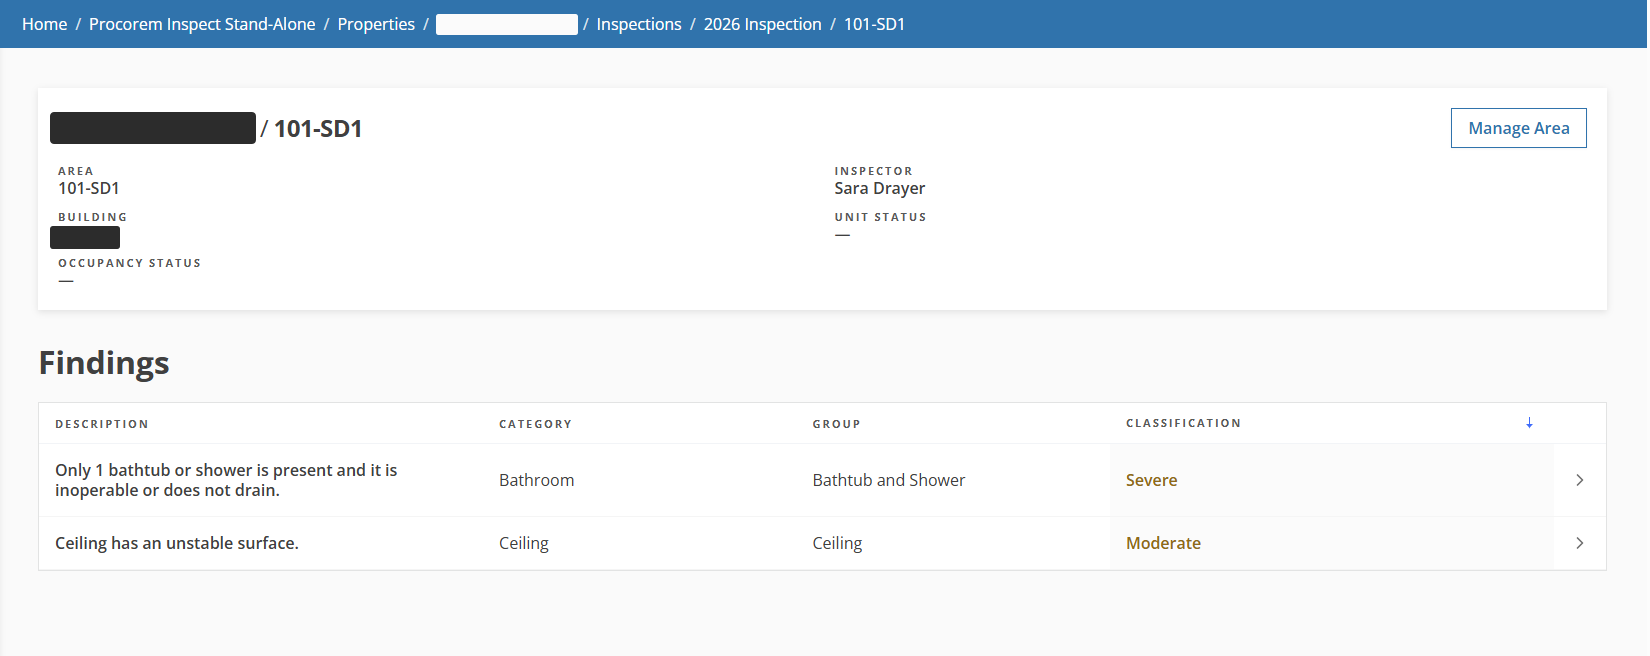
Findings must be added from the mobile app. Once they are uploaded, you can access the findings through the Procorem Inspect module.
From the Areas tab, select an Area row to open the Findings page with a list of the findings for the area.
From the Findings tab on the Inspection record, you can view a list of the findings across areas.
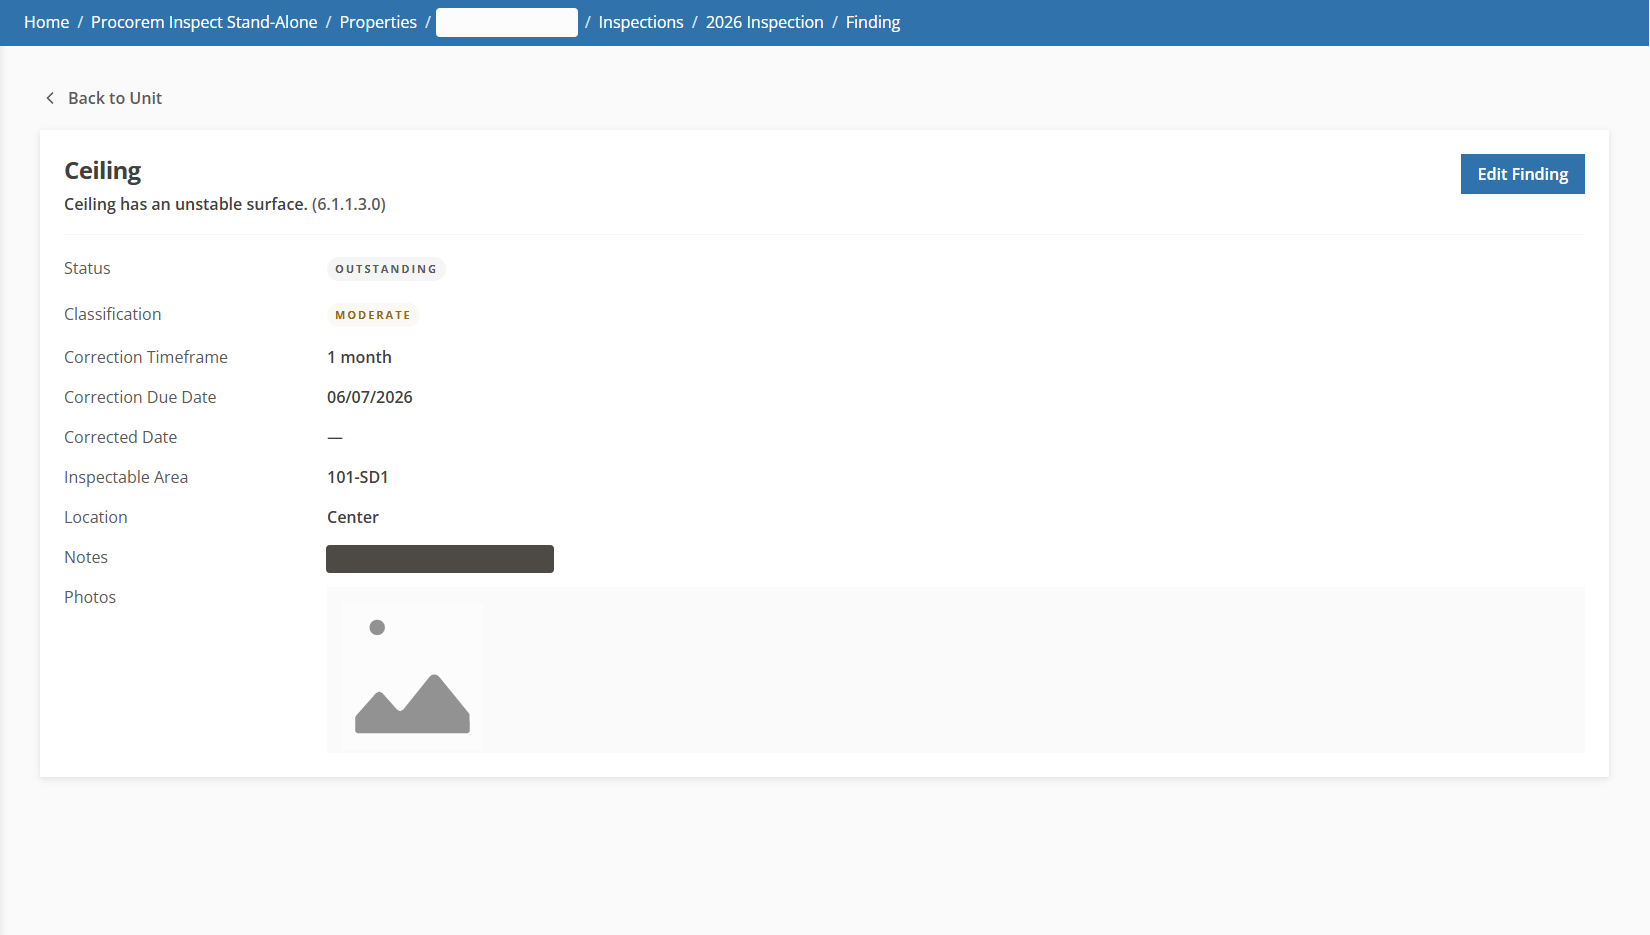
From either location, select a finding to open the Area Finding Details page, which gives a complete view of the finding, including its classification, location, description, correction details, notes, and photos.
The Edit Finding popup allows you to update correction information and location details, or to delete a finding entirely.
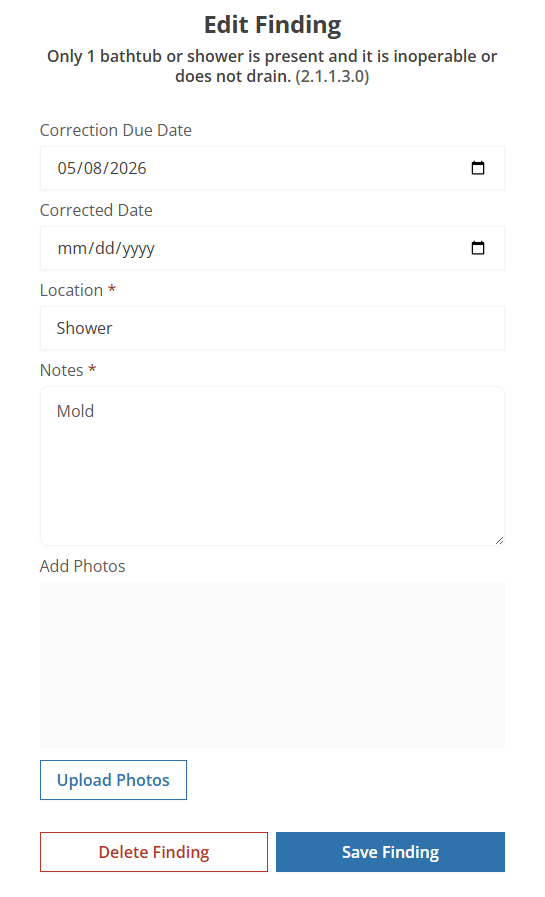
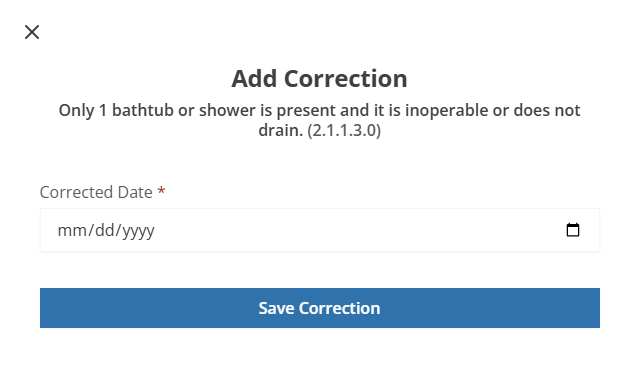
To enter or edit the correction date, you have a couple of options:
Enter or select the Corrected Date on the Edit Finding popup.
Click Add Correction for the row on the Findings tab of the Inspection record. Then, complete the popup.
The Reports tab provides access to both live report previews and finalized, generated report PDFs.
Report Previews—Always available and reflect the current state of the inspection. Shows a card for each report type available based on the inspection template.
Generated Reports—Can be viewed inline or downloaded directly. Shows the saved PDF copies that have been generated for the inspection.

Two report types are available:
Full Inspection Report—Displays all inspection findings per inspection item for a property.
Exigent Report—Displays all critical inspection findings per inspection item for a property.
Note
The reports available depend on the template selected for the inspection.
ProLink supports custom inspection templates. For more information about custom inspection templates, please reach out to ProLink Support.
Navigate to the inspection.
Navigate to the Reports tab.
The Report Previews section shows a card view for each report type that is associated to the inspection template.
Click Preview for the report you want to review.
The preview of the report opens.
You can:
Change the number of Photos per page (1, 2, 4, 8, 12). The default is 8.
Click View Finding to open details of a finding and update the finding, if needed.
Click View Notes to open the Edit Area popup for any area that has notes.
Note
View Finding and View Notes are available if your account role includes the Create or Update Inspections permission.
When you are ready to share the report, click Generate Report.
The report is finalized and you can no longer edit the report instance. It is located in the Generated Reports section. You can now view and download the generated report.
Navigate to the inspection.
Navigate to the Reports tab.
The Generated Reports section shows a card view for each report that has been generated and is available to share.
Click the
 eye icon for the report you want to view, and then click the
  download icon.
OR
Click the
download icon for the report you want to download.
Important
Access to the Property Specific Inspection Items tab is controlled by the Manage Property Specific Inspection Items permission in an Inspection account role.
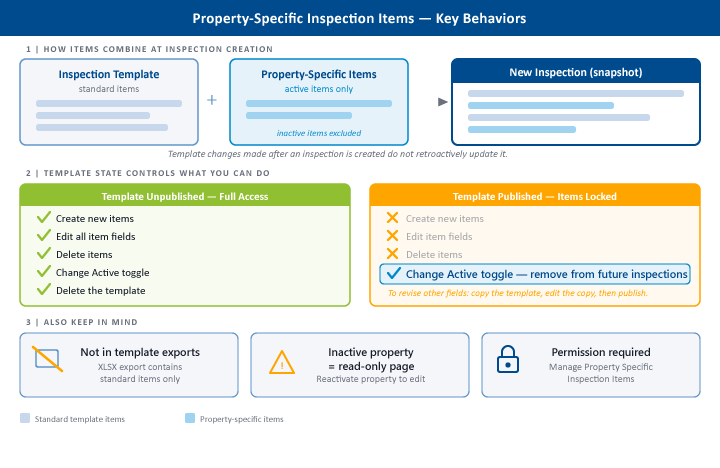
Property-specific inspection items let you extend a standard inspection template with additional items that apply only to a particular property. When an inspection is created for that property using the associated template, the property-specific items are automatically incorporated alongside the template's standard items.
The Property Specific Inspection Items tab is available on the Property Inspections page.

You can:
Select the Template to show only items associated with that template.
Group by Areas (default) or Classifications.
Click any item row to open the Edit Property Specific Inspection Item page.
When a new inspection is created for a property using a template that has property-specific items:
All active property-specific items are incorporated alongside the template's standard items.
Items are organized within the same Area > Category > Group tree that inspectors see in the app and on the Inspection Items tab.
Inspectors interact with property-specific items the same way they interact with standard template items. They can record findings, add photos, and log corrections.
Property-specific items from inactive properties or for inactive items are not included at inspection creation.
Changes made to property-specific items after an inspection is created—including deactivating an item—do not update that inspection. Only newly created inspections reflect the current state.
On the Property Specific Inspection Items tab, click Create Inspection Item, or click any + Create Item link at the Area, Category, or Group level in the tree.
Using a tree-level link pre-populates the Area, Category, or Group context on the creation form.
Complete the Organizational Information:
Associated Inspection Template (required)—Select the template this item extends. Only published templates are available.
Area (required)—Select or create the area.
Classification (required)—Select or create a classification.
Category (required, filtered by the selected Area)—Select or create a category.
Group (required, filtered by the selected Category)—Select or create a group.
Complete the Item Information card:
Item Version Number (required)
Correction Timeframe in Days (optional)
Sort Order (optional)
Description (required)
Criteria, Instructions, Review Criteria, Tools Required, Tools or Equipment Useful (all optional)
Confirm the Active toggle is set to Yes (default).
Click Save.
Property-specific inspection items are incorporated into inspections at the time an inspection is created.
Click an item row in the tree to open the Edit Property Specific Inspection Item page.
If the associated template is not yet published: All fields are editable. Update as needed and click Save.
If the associated template is published: All fields except Active are read-only. To adjust the item's details, you would need to copy the template, update the property-specific items against the copy, and publish the new version.
The Active toggle controls whether an item is incorporated when new inspections are created for this property. This is the primary way to remove a property-specific item from future inspections on a published template.
You can permanently delete a property-specific item only while the associated template is unpublished.
Open the item on the Edit Property Specific Inspection Item page.
Click Delete Item and confirm.