Manage Account Roles
Account Roles let you define custom permission sets and assign them to members of your account. Instead of every member sharing the same level of access, you can create targeted roles that grant exactly the access each person needs.
Before you begin, review these key behaviors:
Permissions are additive. A member with two roles gets the combined permissions of both. There is no way to deny a permission—if any assigned role grants it, the member has it.
Roles are organized by type. Each role belongs to a Security Role Type such as Property or Inspection. The type determines which permissions are available when you build the role.
System roles are locked. Roles marked with a lock icon are pre-built by Procorem and cannot be edited or deleted. Members can be assigned to system roles.
Roles are module-aware. Roles tied to modules your account does not have enabled are hidden until that module is activated.
Only account members receive Account Roles. Guests are not eligible.
The Security Roles page is available to Account Administrators and User Administrators.
In the left navigation panel, select Account Settings.
Select Security Roles.
The Security Roles page opens.
Select the Account Roles tab.
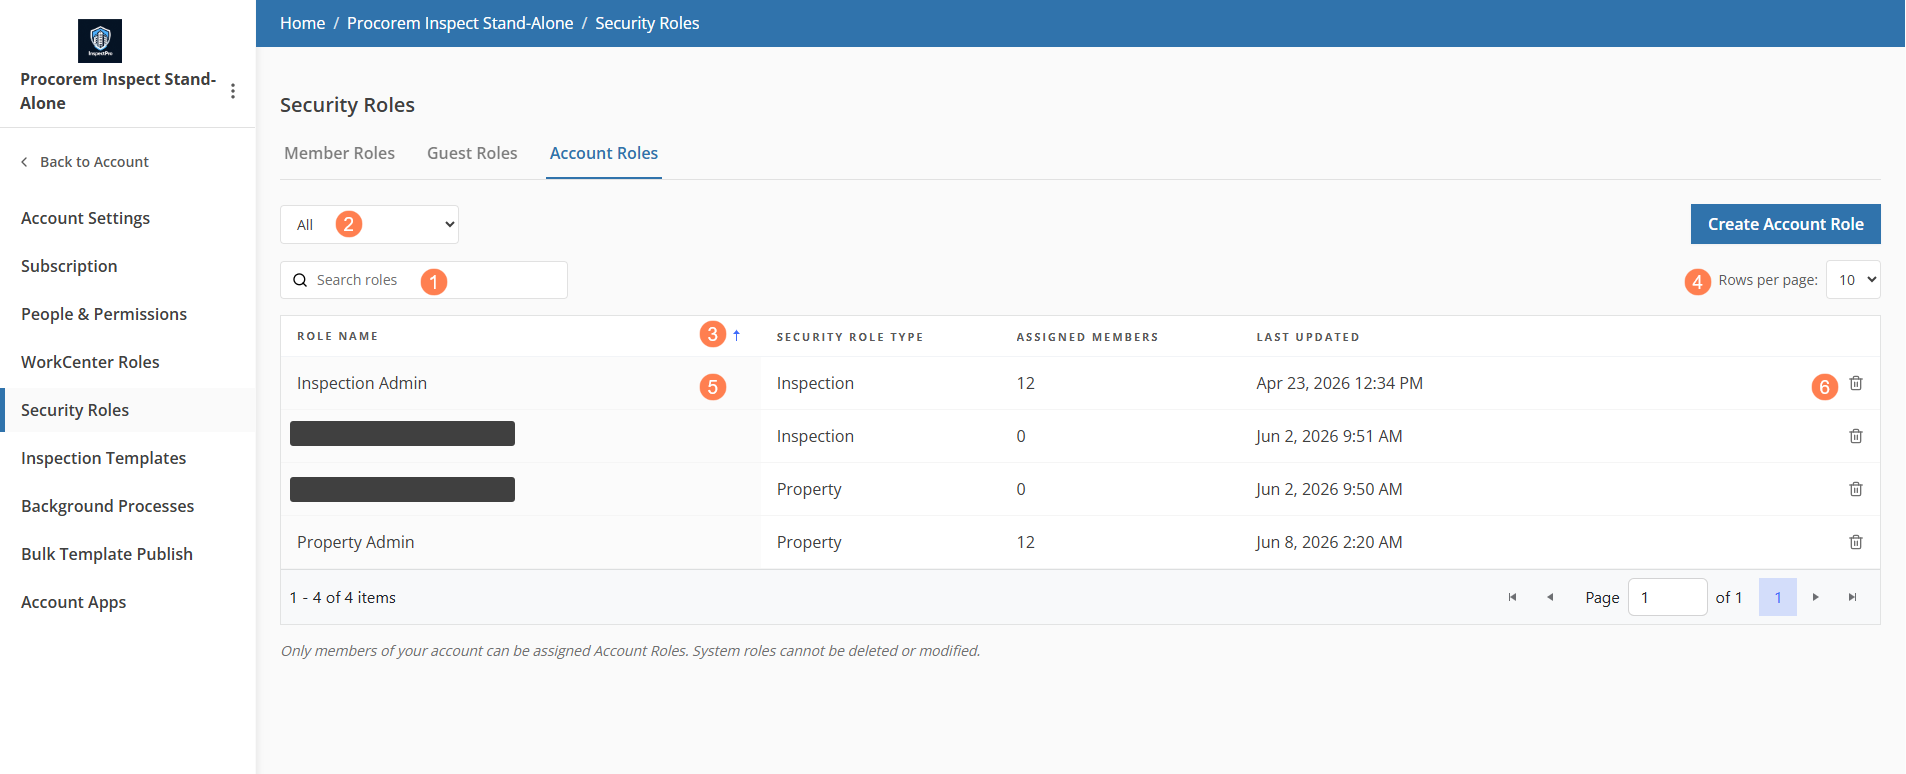
You can use the following controls to find roles in the grid:
Type in the search box to filter by role name as you type.
Use the filter list to show only roles of a specific type. Select All to clear the filter.
Click any column header to sort by that column. Click the same header again to reverse the sort order.
Use the rows-per-page control (10, 20, 50) and pagination arrows to navigate large lists.
Click any role row to open the Edit Account Role page.
Click the trash icon on a role row to open the delete confirmation popup.
Warning
Deleting a role permanently removes it and all its member assignments. Affected members lose any permissions that were granted solely by this role. This action cannot be undone. System roles cannot be deleted.
Column | Description |
|---|---|
Role Name | The name of the role. A lock icon indicates a system role. |
Security Role Type | The type the role belongs to (for example, Property or Inspection). |
Assigned Members | The number of active account members currently assigned to this role. |
Last Updated | The date and time the role was last saved. |
Procorem provides two methods for creating an account role: starting from scratch or copying an existing role.
Use this method to build a new role with no permissions pre-selected.
Click Create Account Role.
A popup opens with two creation methods.
Select Start from Scratch.
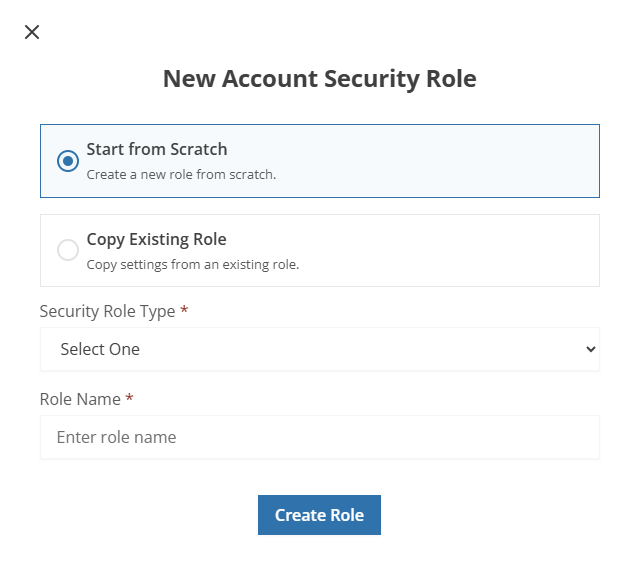
Select a Security Role Type.
The type determines which permissions are available.
Enter a Role Name.
The name is required, up to 200 characters, and must be unique within your account.
Click Create Role.
The Edit Account Role page opens with no permissions selected.
Use this method to create a new role that starts with the same permissions as an existing role.
Click Create Account Role.
A popup opens with two creation methods.
Select Copy Existing Role.
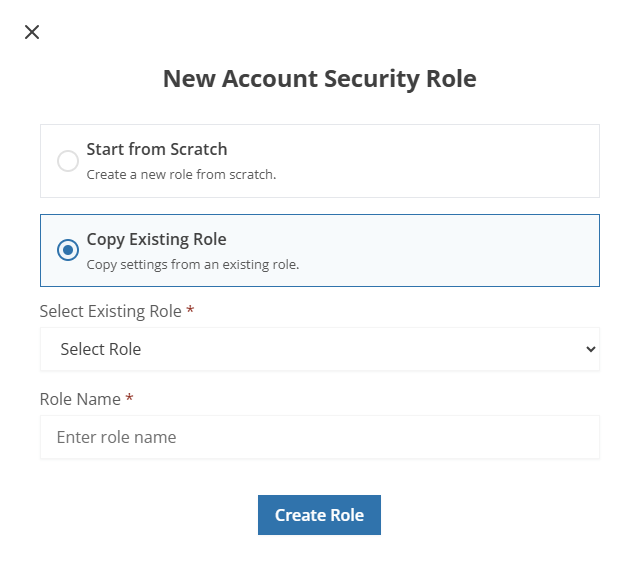
Select the role to copy from the Select Existing Role list.
Enter a new Role Name.
The name cannot match the source role or any other existing role in your account.
Click Create Role.
The Edit Account Role page opens with all permissions from the source role pre-selected. Member assignments from the source role are not copied.
Click any non-system role row on the Account Roles tab to open the Edit Account Role page. The page has two tabs: Permissions and Assigned Members.
Use the Permissions tab to rename the role and configure which permissions it grants.
Note
System roles open in read-only mode. All fields are disabled and a banner indicates the role cannot be modified. The Assigned Members tab remains available for system roles.
Select the Permissions tab.
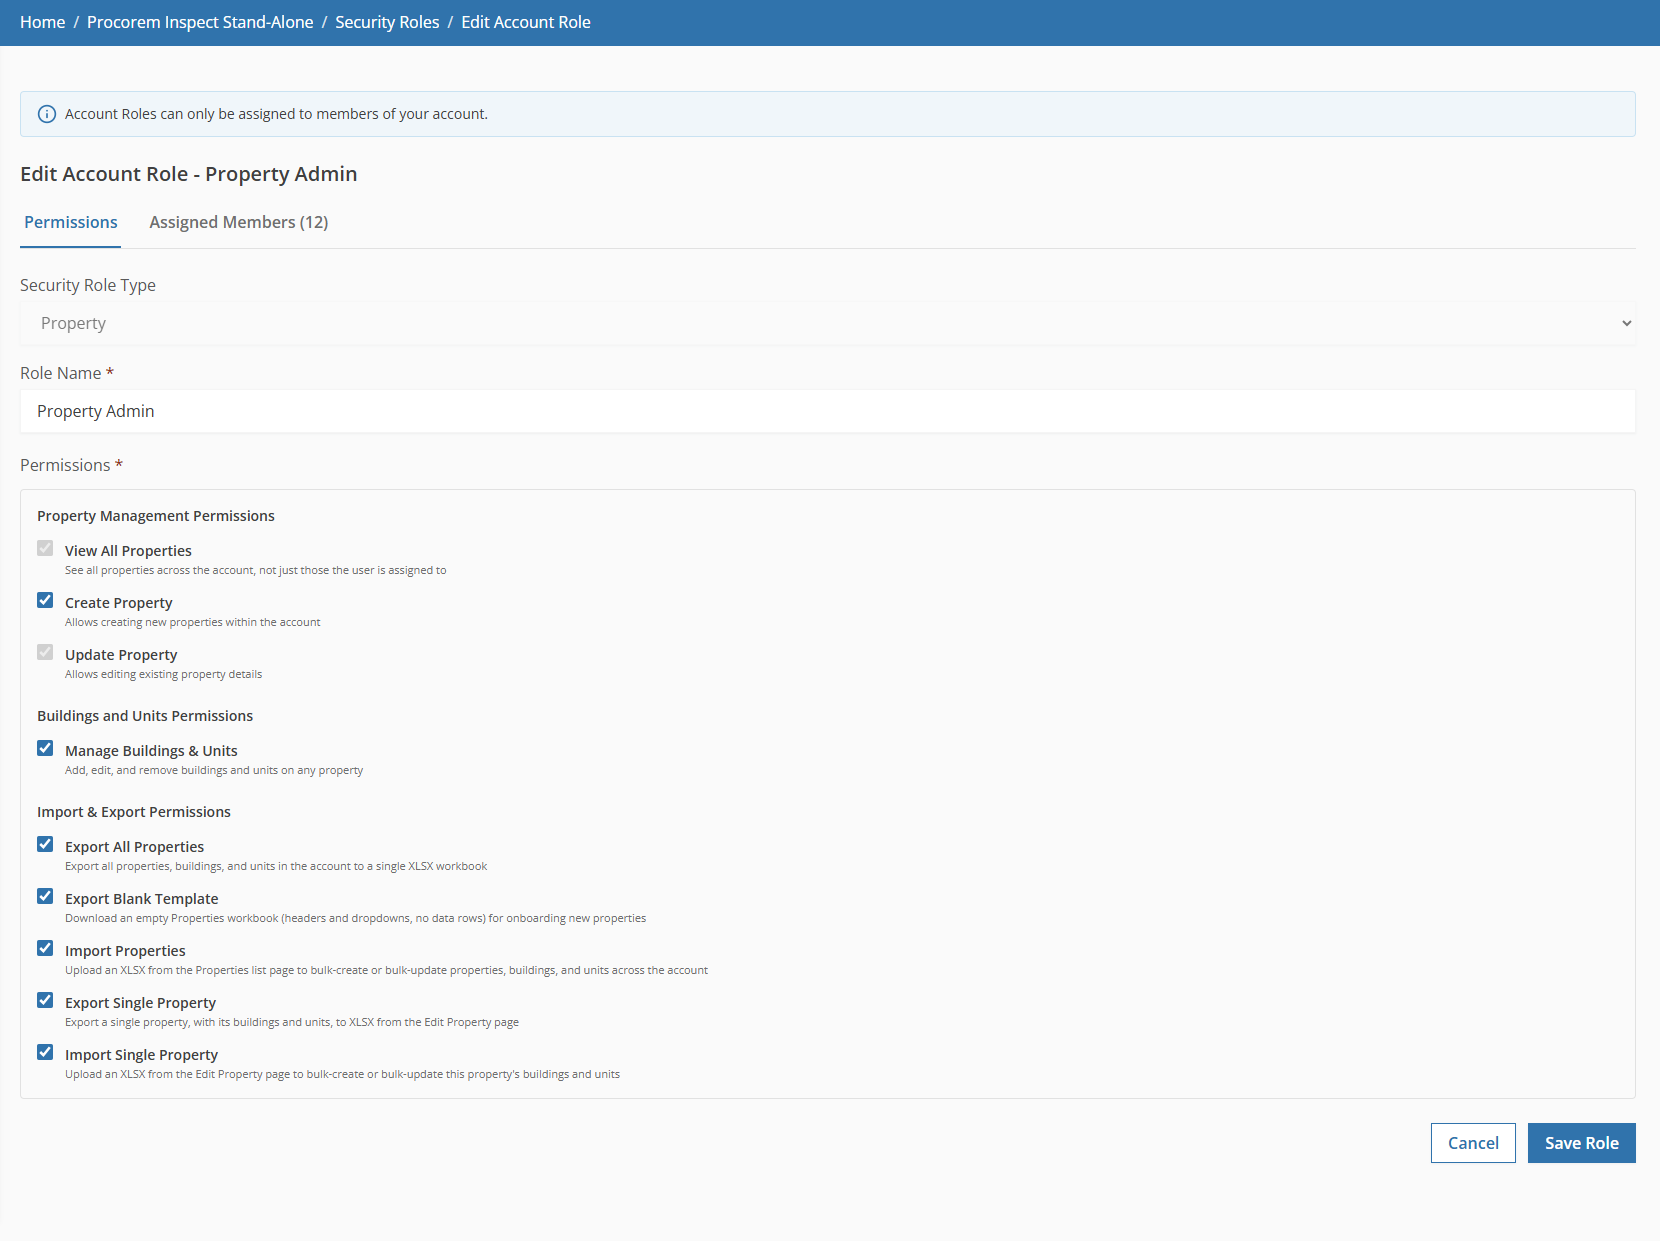
Note
The Security Role Type is shown for reference only and cannot be changed after a role is created.
Update the Role Name if needed. The name must remain unique within your account.
Select or clear permissions in the list. Permissions are grouped by category with a description beneath each one. At least one permission must remain selected.
Click Save.
Use the Assigned Members tab to grant this role to a member of your account.
Select the Assigned Members tab.
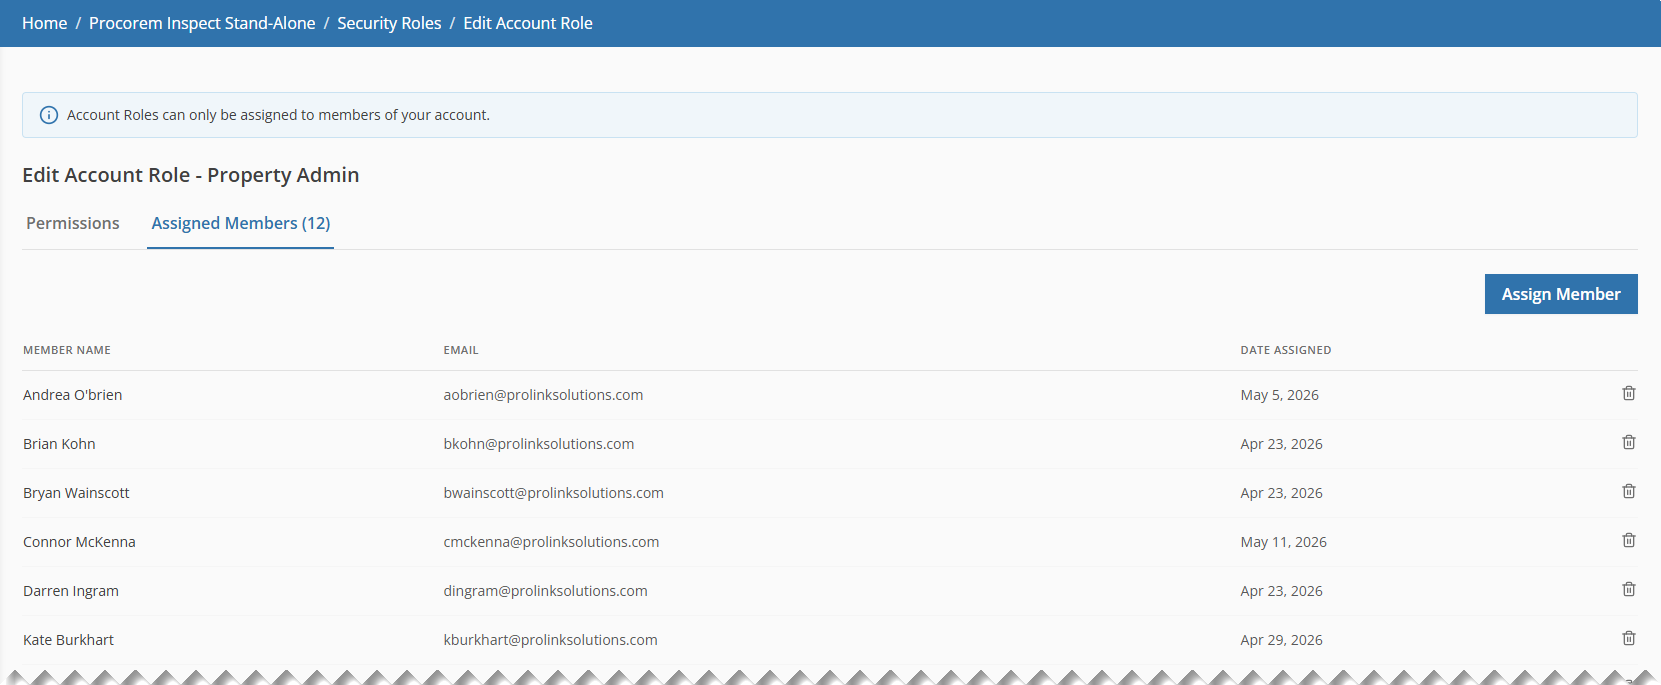
Click Assign Member in the top-right of the tab.
A popup opens.
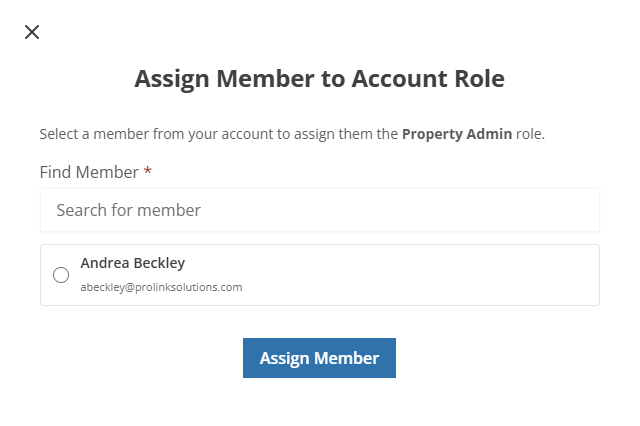
In the Find Member field, type a name or email address.
Matching members appear as you type. Members already assigned to this role do not appear in search results. Members who have been invited but have not yet accepted can be assigned before they log in for the first time.
Select a member from the results.
Click Assign Member.
The member is added to the grid.
Use the Assigned Members tab to revoke this role from a member.
Select the Assigned Members tab.
Click the trash icon on the member's row.
A confirmation popup opens.
Click Remove Member to confirm.
The member is removed from the role and loses the permissions it granted.
The following tables describe the available permissions for each Security Role Type. The permissions available to your account depend on which modules are enabled.
Property permissions control what members can see and do on the Properties, Buildings, and Units pages.
Permission | What It Controls |
|---|---|
Create Property | Show the Add Property button on the Properties list and create new properties. |
Update Property | Show the Edit Property button on the property overview page and save changes to existing properties. |
View All Properties | Show the Properties menu item in the left navigation panel and access the Properties list page. Without this permission, the Properties section is hidden. |
Manage Buildings & Units | Add, edit, and remove buildings and units on any property, including the Add Building and Add Unit buttons. |
Export All Properties | Export all properties, buildings, and units in the account to a single XLSX workbook from the Properties list page. |
Export Blank Template | Download an empty Properties workbook (with headers and dropdowns, no data) for onboarding new properties. |
Import Properties | Upload an XLSX from the Properties list page to bulk-create or bulk-update properties, buildings, and units across the account. |
Export Single Property | Export a single property, including its buildings and units, to XLSX from the Edit Property page. |
Import Single Property | Upload an XLSX from the Edit Property page to bulk-update that property's buildings and units. |
Inspection permissions control what members can see and do on the Inspections, Findings, Reports, Templates, and Property-Specific Inspection Items pages.
Permission | What It Controls |
|---|---|
Create Inspection | Show the New Inspection button on the Inspections list and create new inspections. |
Update Inspection | Show the Manage Inspection button on the inspection detail page; add and edit areas and findings, upload photos, and generate reports. |
Delete Inspection | Show the Delete button inside the Manage Inspection popup. |
View All Inspections | Show the Inspections menu item in the left navigation panel and the Inspections sub-menu on property pages. Without this permission, the Inspections section is hidden. |
Manage Inspection Templates | Show the Inspection Templates menu item in the left navigation panel and access the templates page. |
Manage Property Specific Inspection Items | Show the Property Specific Inspection Items tab on the property details page and access that page directly. |