Profile and Preferences
Within Procorem, you have the ability to customize a wide range of information about yourself to make visible to other users. This includes your profile picture, name, time zone preferences, physical address, phone number, and more. In the same area as you manage your profile, you can also manage your preferences for Procorem such as your password and email notification schedule.
Access Your Profile and Preferences
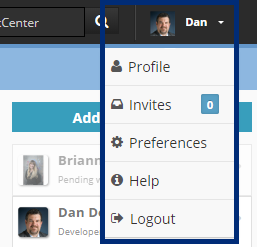
Within Procorem, you can access your Profile at any time. Navigate to the top right corner of the application and click next to your name. The profile area is located right next to the search in the top right corner of the application.
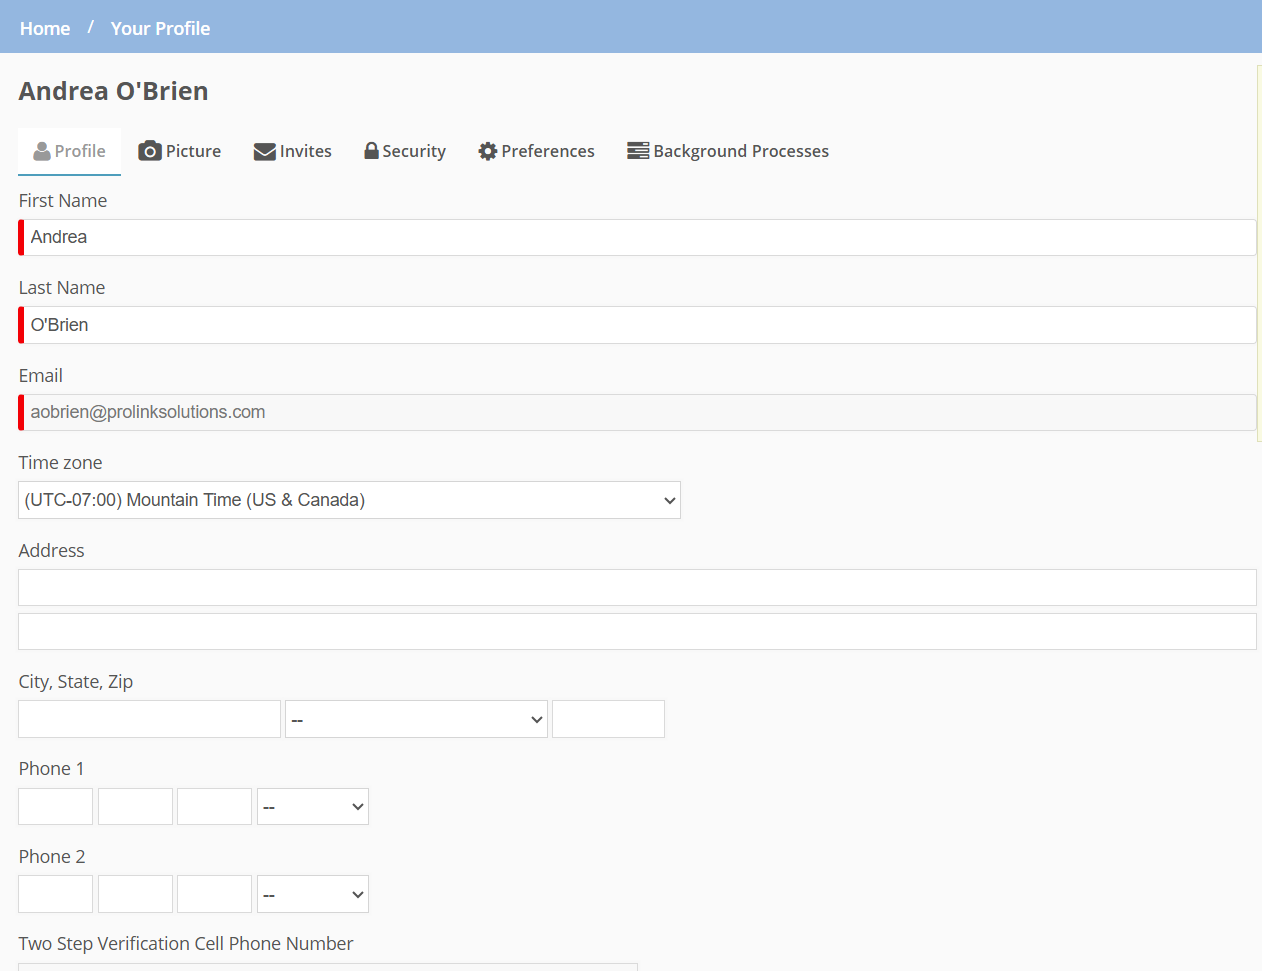
The Profile tab allows you to change a wide range of personal information. This information controls your time zone as well as provides other users information about yourself. Feel free to fill as much or as little as you would like.
The read-only Two Step Verification Cell Phone Number field shows the number on the Security tab, if one was entered.
Upload Your Picture
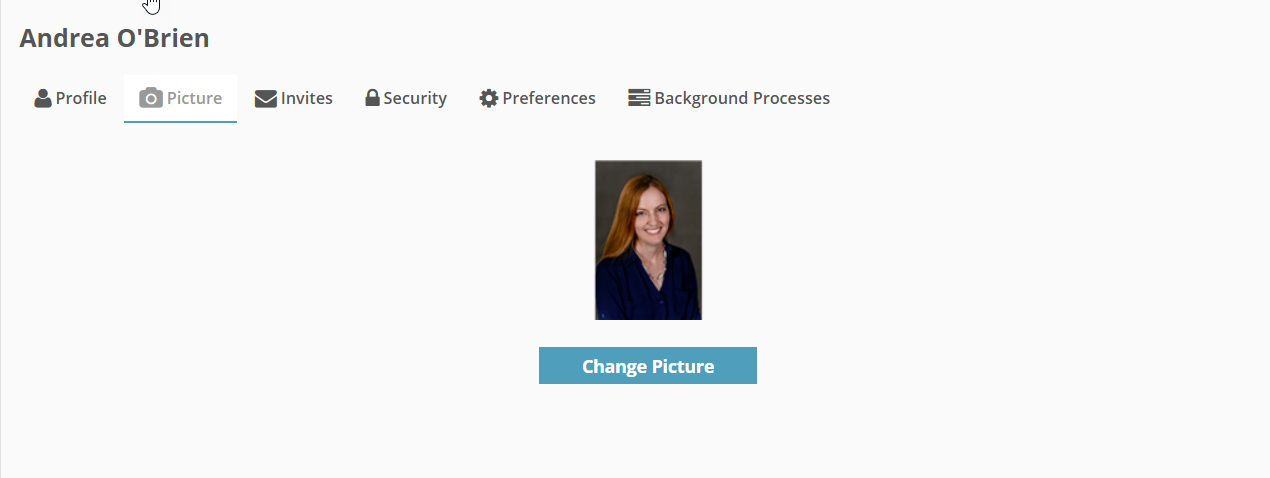
To upload or change a profile picture, click the Picture tab under the Profile settings. From there click Change Picture or Upload Photo and select a picture of your choosing.
Manage Your Invitations
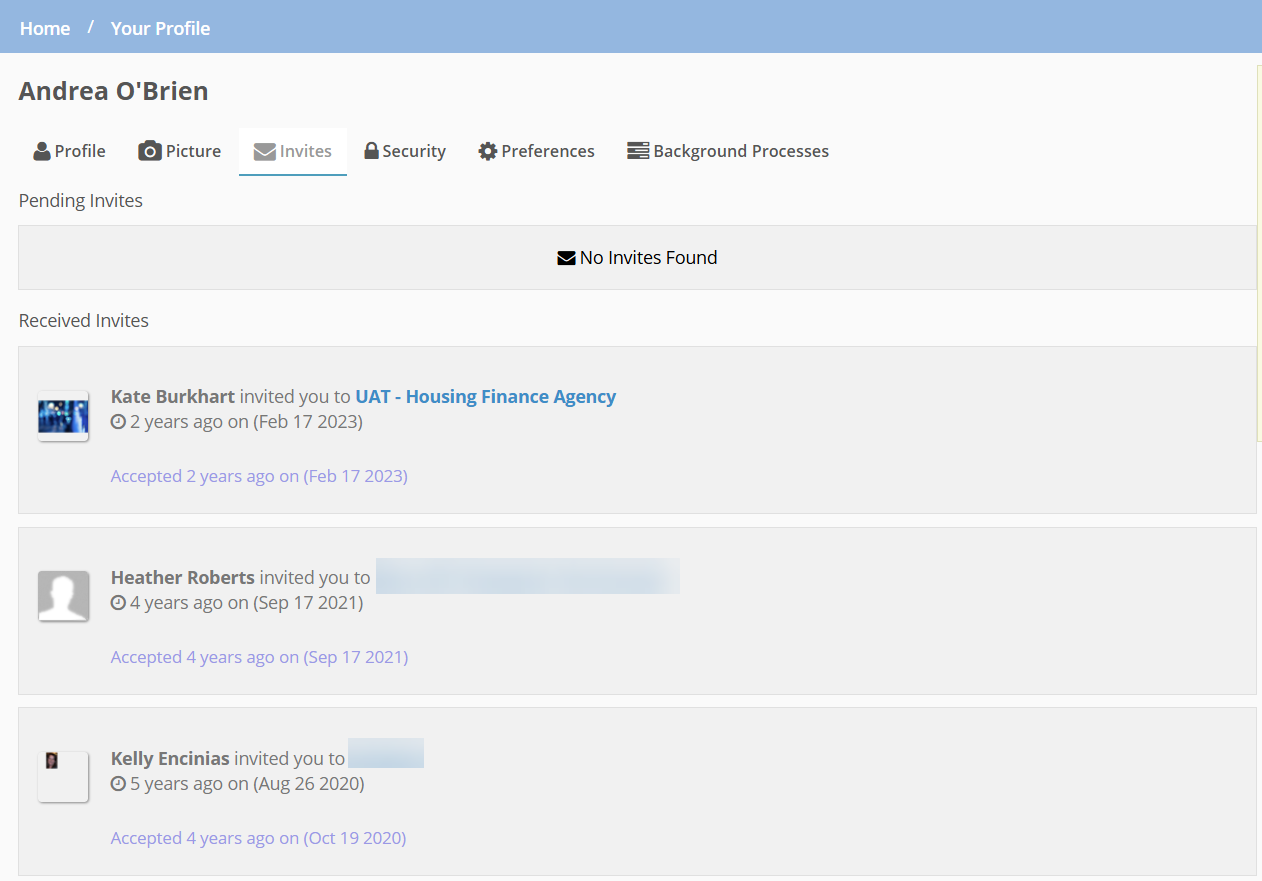
If at any time you would like to check for Pending, Received, or Sent Invites, click the Invites tab under the Profile Settings. Here you can see all your Account invitations that are pending as well as ones which you have received or sent.
Manage Your Account Access
The Security tab allows you to update your password and manage two-step verification.
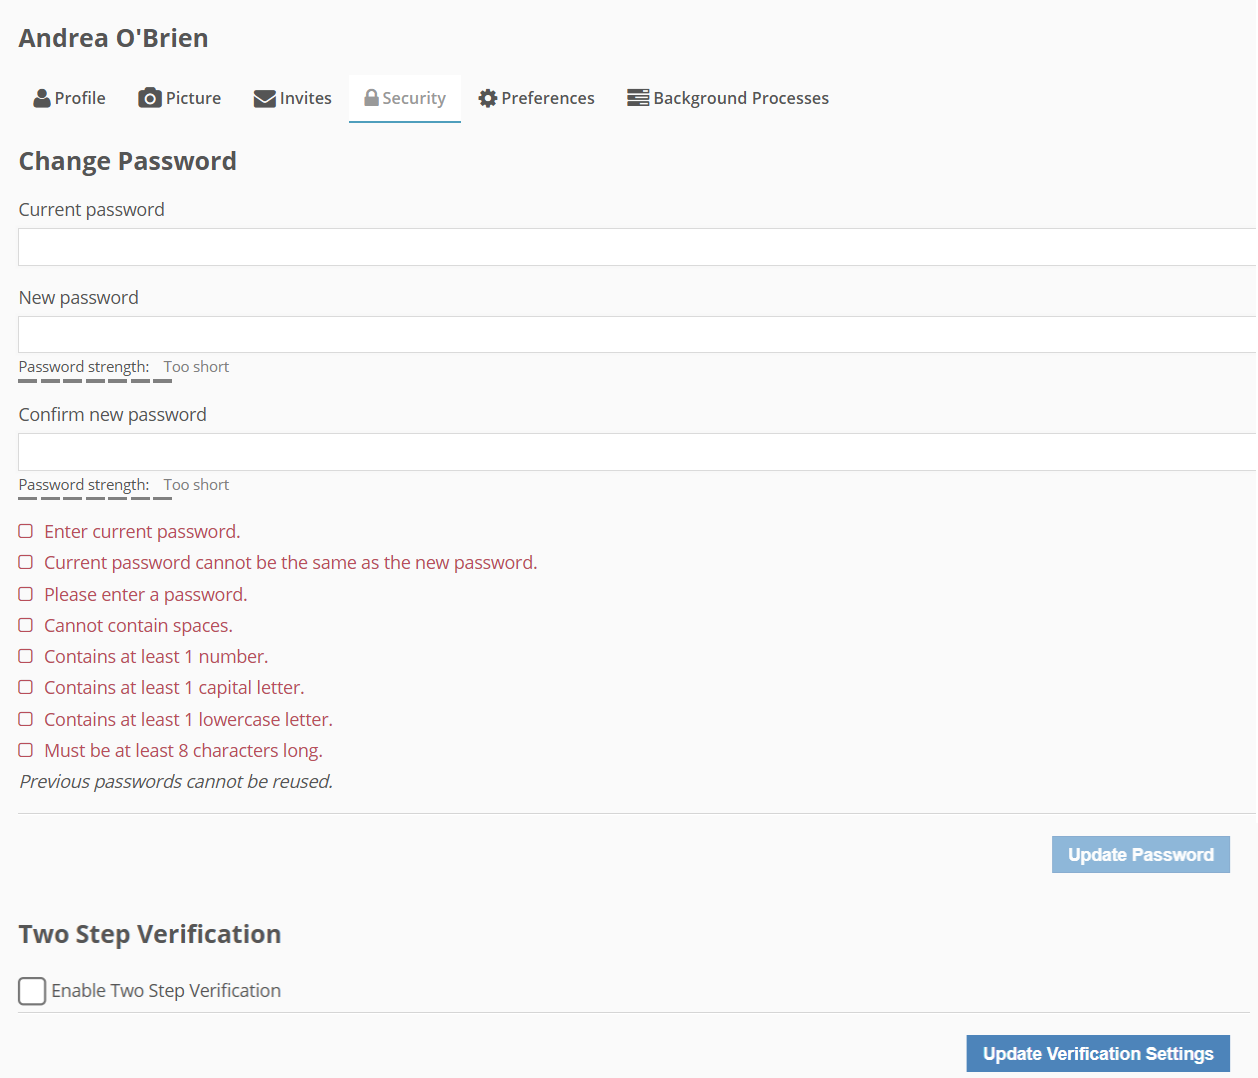
Change Your Password
To update your password in Procorem, enter your existing password as well as enter a new password. Before moving on, the system will ensure that you adhere to our password requirements.
A new password cannot be the same as the current or previous passwords.
Manage Two-Step Verification
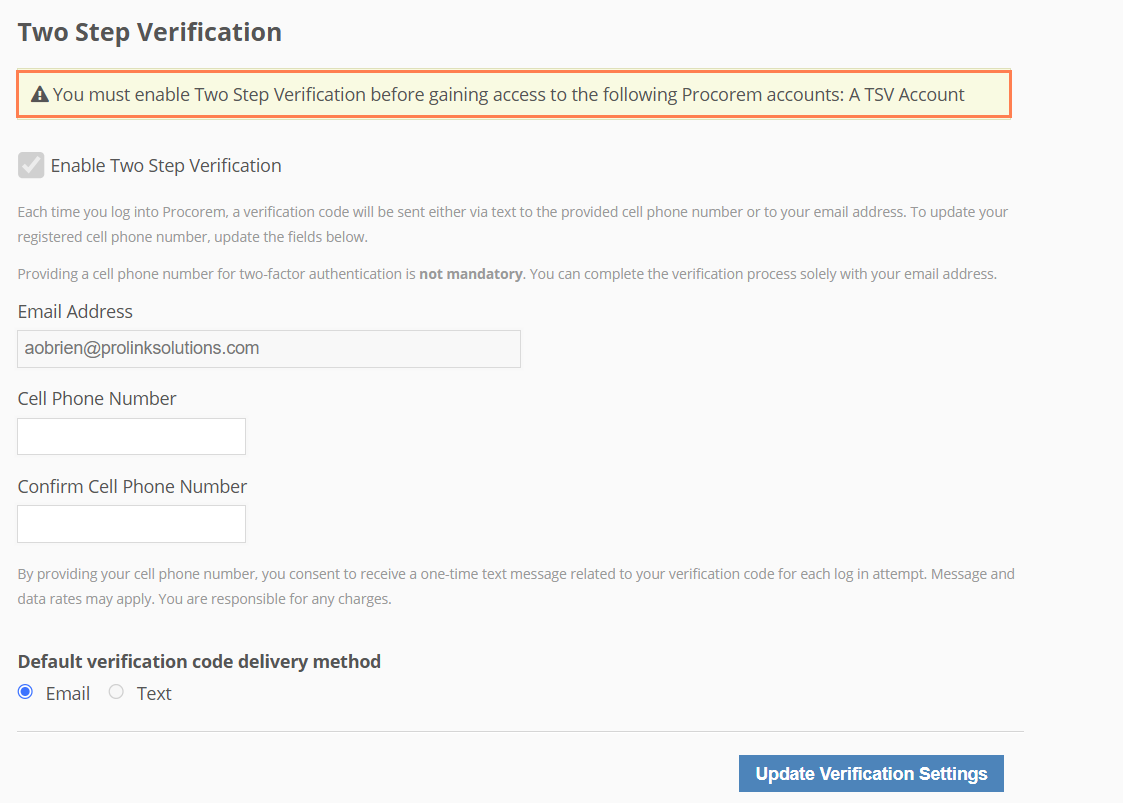
The Two Step Verification section allows you enable two-step verification for your user profile for more security.
Select the Enable Two Step Verification checkbox.
Additional information and options appear.
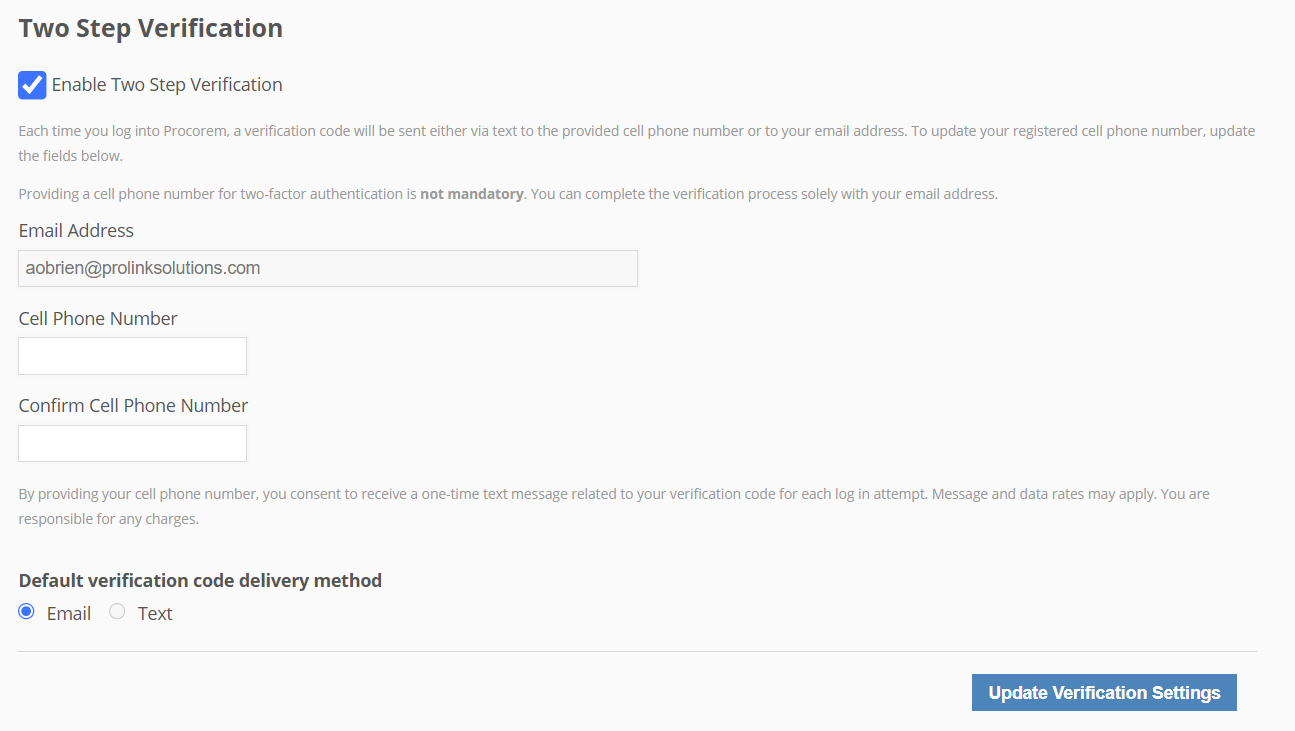
The Email Address field is populated (read-only) with your Procorem email address, which is used for the default verification method.
Optionally, enter and confirm your cell phone number.
Select Email (default) or Text (if you provided your cell phone number) for the Default verification code delivery method.
Click Update Verification Settings.
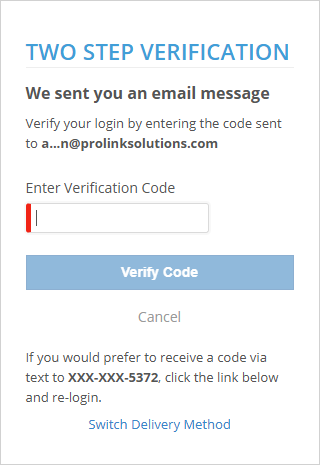
When two-step verification is enabled, after you enter your login credentials on the Login page, you will be prompted to enter the verification code that is sent through email or text, depending on the delivery method selected.
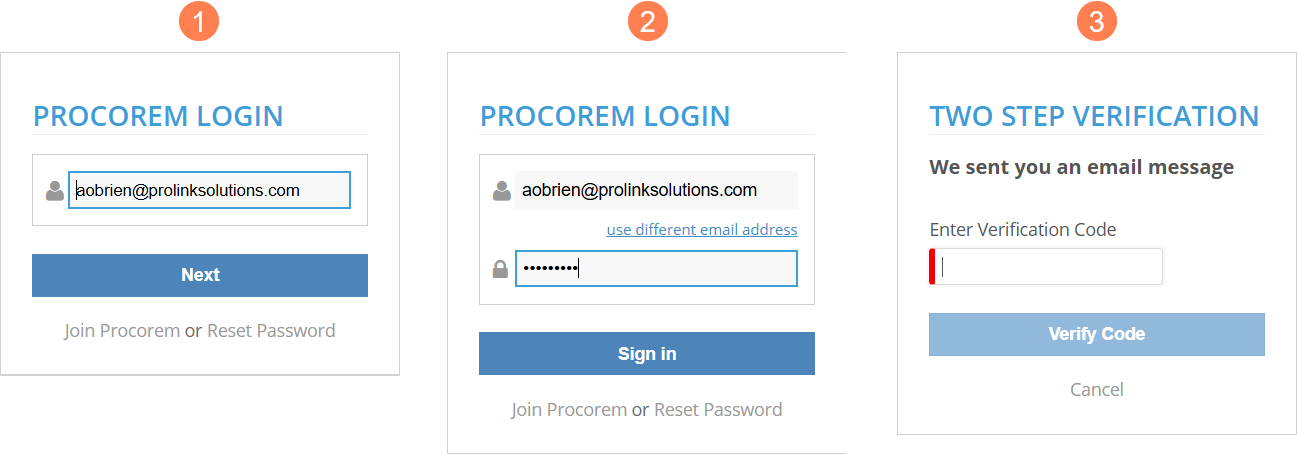
Two-Step Verification Login Process

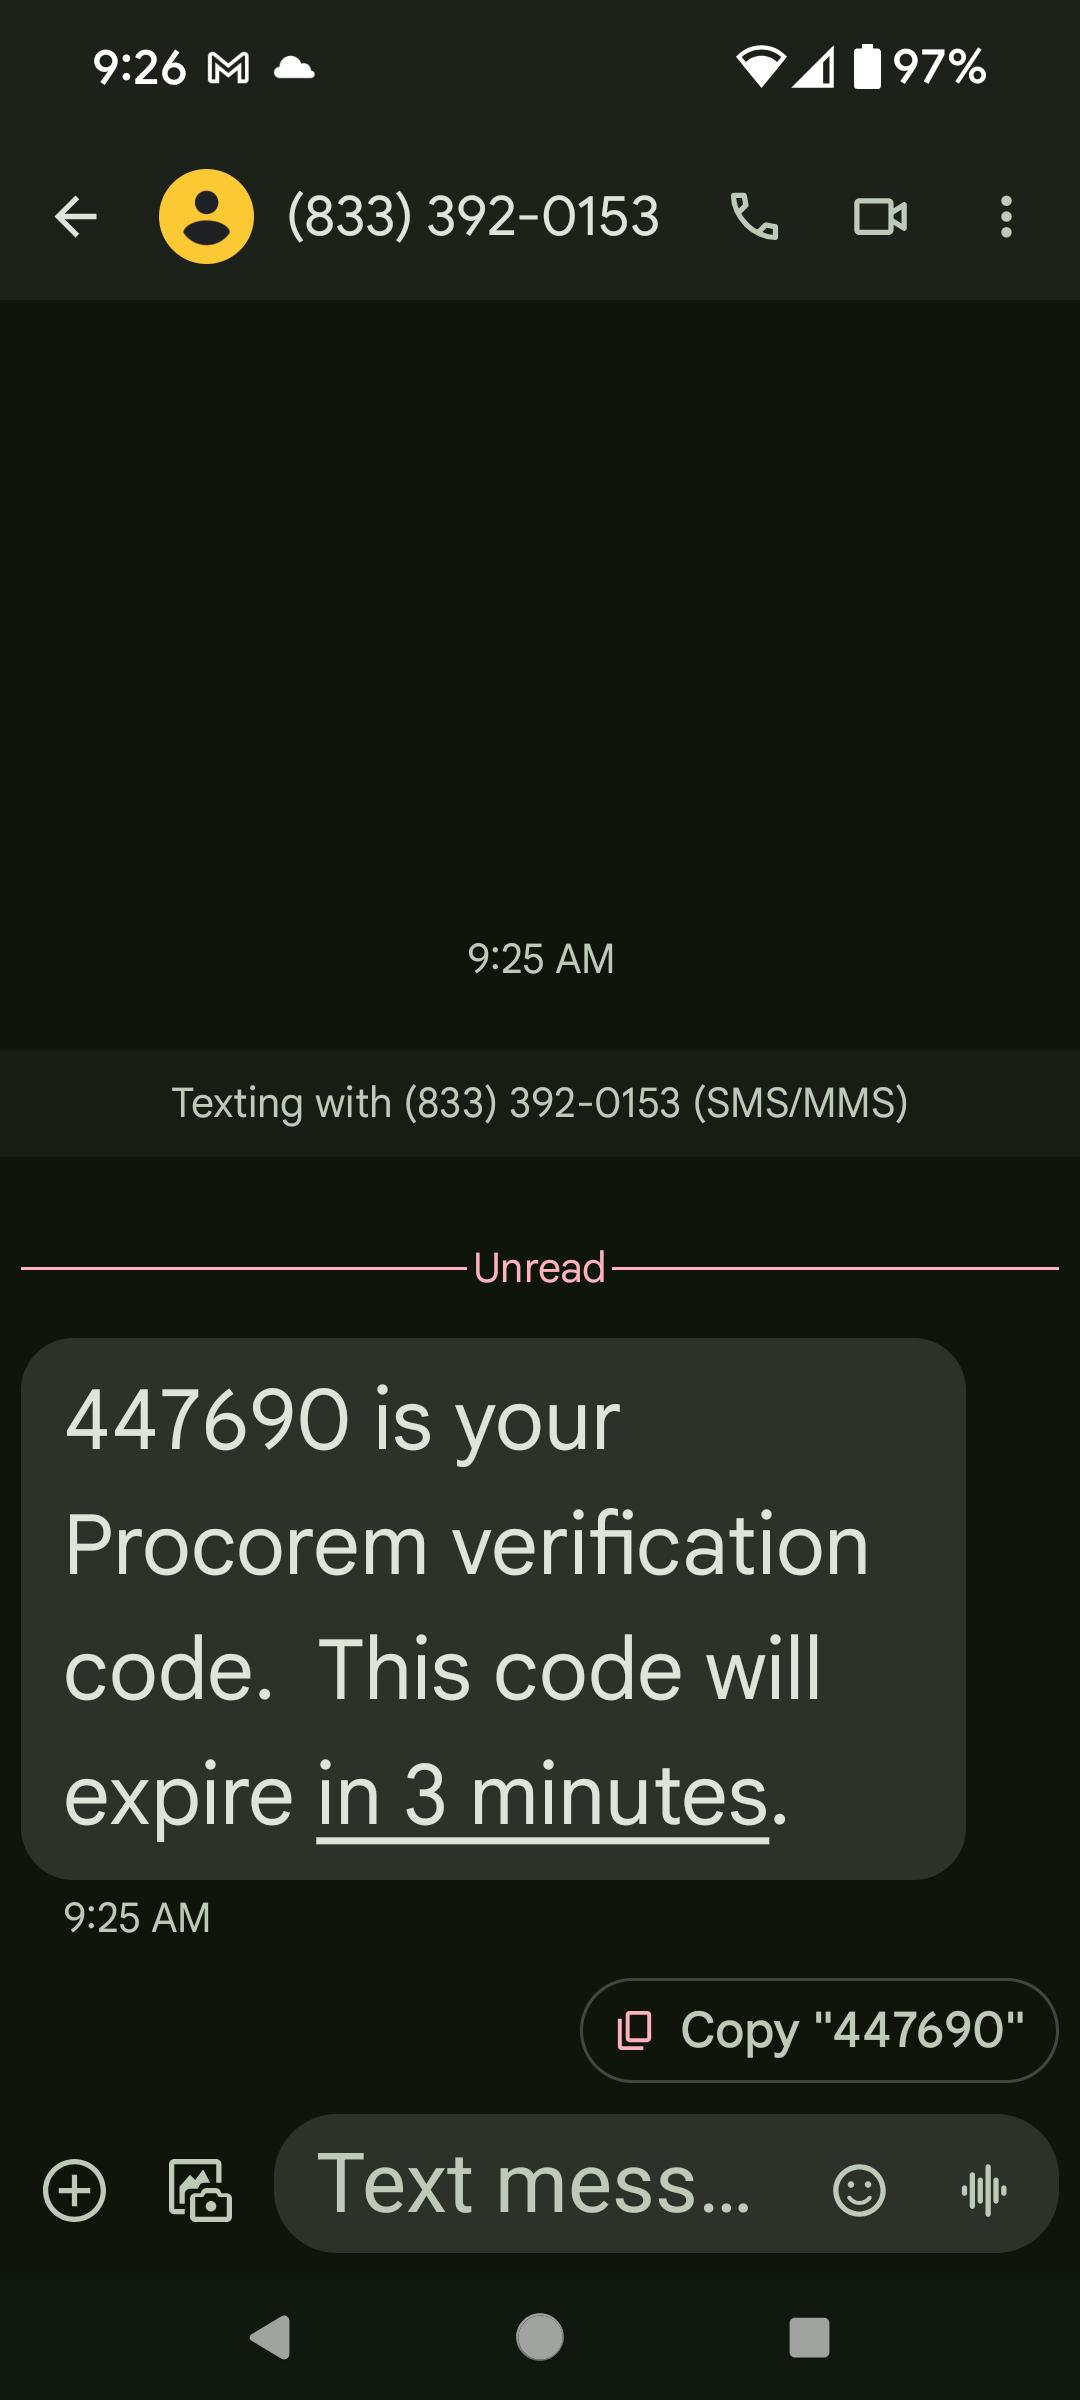
Email Verification Code; Text Verification Code
If your profile has both email and text set up, you can switch the delivery method.
Note
Your Account Administrator might have configured Procorem so that two-step verification is required. If any of your accounts require two-step verification, the system will force compliance through the default email verification method.
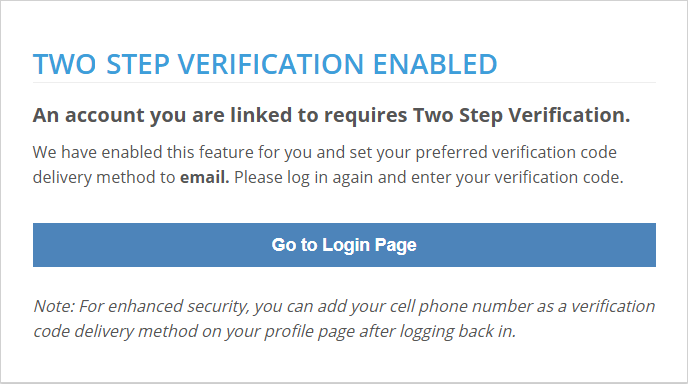
You can see which account(s) require two-step verification.
Note
If SSO has been enabled for an email domain, the system bypasses the Two Step Verification Code flow on login, even if Two Step Verification is enabled on the your profile.
If SSO is enabled, the Two Step Verification section on your Profile page is hidden.
Manage Email Notifications and Preferences
With Procorem you have the option to subscribe to three types of notifications or turn them off all together. Each WorkCenter has its own preferences so you can control these notifications by WorkCenter.
Immediate Emails—Selecting the Immediate Emails preference will ensure that you receive email notifications on all WorkCenter related activities. Any time comments are made, tasks statuses change, documents are engaged with, you will receive a notification to ensure you stay informed.
Daily Digest—The daily digest provides a summary of all the activity, across all subscribed WorkCenters, in a consolidated email, excluding activity from archived WorkCenters. Once a day, users receive the email which outlines task updates, trending topics and documents, and important project milestones.
Weekly Digest—The weekly digest provides the same information as the daily digest, only on a weekly schedule. The weekly digest is an excellent option for executives and project participants who don’t need to be overly involved in a project, but would like to stay generally informed via email.
If your notifications are turned on, you must choose either Immediate or Digest notifications for each WorkCenter. The default will be Immediate Notifications until the preferences are changed.
Account Administrators can also choose to receive a digest for WorkCenters they are not an active collaborator. This allows Account Administrators access into all Procorem activities regardless of WorkCenter subscription.
To manage email notifications:
Log into Procorem and navigate to your profile page.
Click the Preferences tab to manage your daily digest subscription preferences. Make sure to note the options between a daily digest (send once a day) and weekly digest (sent once a week).
Select which account to set preferences. Preferences can be controlled for each WorkCenter differently so you can receive immediate notifications for more active and high priority WorkCenters while still having the option to reduce the amount of notification emails from other WorkCenters.
Tip
Often administrators would like to get email notifications for WorkCenters even if they are not a collaborator. In this case, select the “Include any WorkCenter I am not on in my digest email for…” checkbox for the Account you have selected. This will ensure you stay aware of all activity under that Account in Procorem.
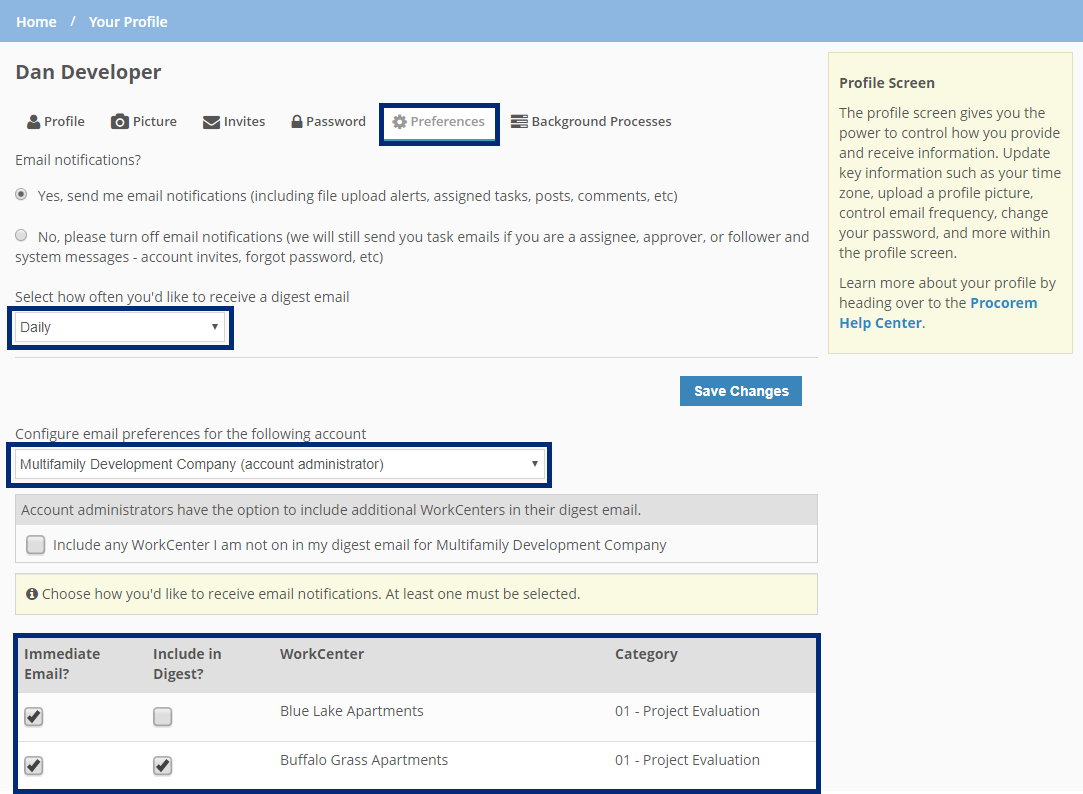
Save your changes.
See the Notifications section for more information.
View Background Processes
In Procorem, you can easily move, copy and delete files in bulk from one WorkCenter to another. To learn more about bulk file transfers, please review the Bulk File & Folder Management section of the Help Center.
On top of the ability to mass transfer documents, Procorem allows you to create WorkCenter templates in order to quickly replicate Tasks, Comments, Documents, Folders, and Collaborators between WorkCenters. Check out the WorkCenter Template section of the Help Center for more information.
Any time you move, copy, transfer, or import information in Procorem, the progress and activity you make will be tracked in your Background Processes section of your Profile. This tab will provide insight into the current status of a transfer, any errors related to the transfer, and when the transfer is complete.
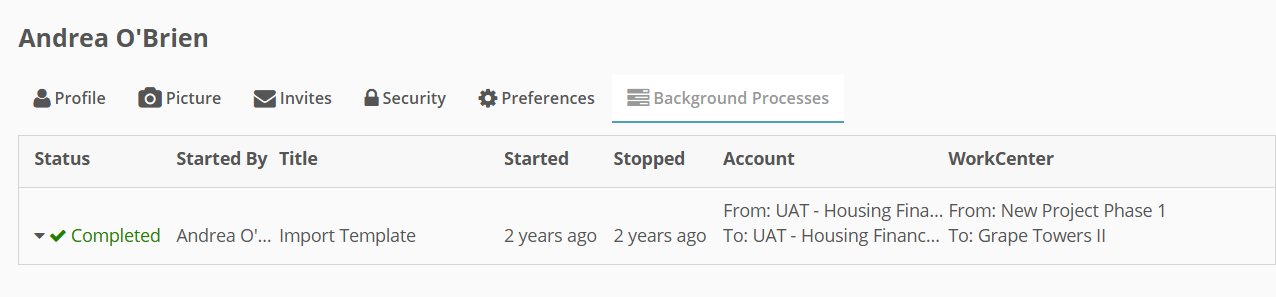
Note
You can access Background Processes on the Account level and on your profile. On the Profile tab you will only see the Background Processes you initiated. Account Background Processes will allow Account Administrators the ability to view background processes (past and present) for the entire account, regardless of who initiated the action. For more on Account Background Processes, please see the Background Processes article.